Edward Z88
-
Posts
3,292 -
Joined
-
Last visited
-
Days Won
85
Posts posted by Edward Z88
-
-
Hi David & Chris,
1 hour ago, stowedout said:My next project is to try using an Akai APC20 and assign faders to parameters to give a bit more flexibility while busking shows
12 minutes ago, Davidmk said:How are you planning to use faders in this context?
Most MIDI fader banks, send their fader levels over the MIDI Control Change (CC) protocol. ZerOS currently doesn't support this protocol, however it is on our software tracker as a potential future enhancement (software tracker reference number ZOS-10271).
The three MIDI protocols currently supported in ZerOS are Timecode, Show Control and Notes. I am not aware of such a device, but it could be possible that when a MIDI fader hits a certain level, it fires a MIDI Note, allowing you take advantage of MIDI fader handles purely to trigger ZerOS.
If you have any questions let us know.
Edward
-
Dear All,
Zero 88 are pleased to announce the launch of ZerOS version 7.9.8 software - a new software release for the following consoles:
- FLX
- FLX S24
- FLX S48
- ZerOS Server
- Solution
- Solution XL
- ORB
- ORB XF
- SCD Server
- Leapfrog 48 & 96
The ZerOS 7.9.8 download for your console, Phantom ZerOS 7.9.8 offline editor download, and the release notes, can be found at zero88.com/zeros
Also available from the link is the new ZerOS Monitor 2.0 for Windows, supporting new keyboard shortcuts to allow you to remotely control your console.
If you have any questions, please don't hesitate to contact us at support@zero88.com
Kind regards
Edward
-
Hello,
1 hour ago, Davidmk said:You will need a USB to midi interface. There is one that Z88 recommend
This is the one we use for training, testing, and demonstrations...
https://motu.com/products/midi/fastlane_usb
Edward
-
Hello,
3 hours ago, delicolor said:Edward, I assume that if I route the DMX OUT to DMX IN via a splitter in the above scenario, the channels I don't use to trigger Playbacks are available to route on to fixtures if desired?
Yes, exactly right. Rather than wasting a whole output for just a few channels used to trigger your playbacks, you could use a DMX splitter plugged into a DMX output, route one of the outputs back into the console, and then use the other outputs to control fixtures.
Edward
-
Hi Mac,
8 minutes ago, Davidmk said:Stowedout did a topic on this, it's pinned near the top of the FLX page, he uses a different approach that you might find interesting.
Yes, take a look at @stowedout’s quick overview of his set up below...
This is the thread David mentioned, which explains this...
I’m sure you have seen this article already, but for the ZerOS side on how this is configured, see below...
http://support.zero88.com/990063141
If you have any questions let us know.
Edward
-
Hello,
ZerOS does not use the customised wheel groups defined in the Fixture Editor. These are used by legacy consoles.
The order ZerOS consoles will display the parameters on the encoder wheels, is the order the parameters are listed in the Fixture Editor. To move a parameter to the end of an attribute, change the parameter to a different attribute, and then back again.
If you wish to have your “White” parameter on the third encoder wheel, you would need to create a pair of dummy parameters, that would sit on encoders 1 and 2 of the second encoder page.
When creating fixture files, we tend to only ever list parameters in the order of DMX address, unless there are odd cases where two related parameters are not next to each other, such as a function, and the function’s speed, or a function, and the function’s rotation.
If you have any questions let me know.
Edward
-
Hi Adam,
Welcome to the Zero 88 Forum.
30 minutes ago, StageAdam said:Hello in the chasers speed if I selected manual how do I Trigger it
What console are you using?
Edward
-
Hi Joe,
23 minutes ago, JWylie91 said:when saving an effect such as chase 1/2 in cue 2 where cue 1 is simply bringing the intensity up to 100 the effect seems to be being registered and the intensities of my Rogue R1's drop to 50 when calling cue 2. The fixture also shows the chaser 1/2 effect in the intensity section of the cue window, however there is no movement of intensity values or visible effect.
So to confirm, cue 1 has your fixtures at full. Then select the fixtures, and apply Chaser 1/2. As part of this effect, the fixtures are automatically taken to 50%. You then record this as cue 2.
On playing this back, when going into cue 2 from cue 1, your fixtures will fade down, with the intensity chase fading up. You should then end up with chasing intensity percentages displayed in green in the Output Window.
Are you finding in cue 2 your fixture intensities stay at 50%, displayed in green in the Output window? If so it sounds as though the Size of the effect is recorded at 0?
Edward
-
Hi Joe,
If you select the fixture, and open the "Shutter, Strobe, Control" parameter details by tapping the middle encoder button, try tapping the last "Macros" detail, which will set the parameter to a DMX level of 251. Leave it there for a few seconds, and see whether the fixtures respond. If they don't, it sounds like DMX Lamp Off is disabled in the fixture menu.
If you have any questions let me know.
Edward
-
Hi Joe,
26 minutes ago, JWylie91 said:When I create auto macros for my Mac 250 Entours I used to always get a Lamp on and a Lamp off macro auto produced.
I have just taken a look at the Martin Mac 250 Entour fixture. The new library has a "Fixture Global Reset", and a "Lamp Off" macro available for the fixture.
28 minutes ago, JWylie91 said:- No Lamp off in shutter options when the Mac's are selected - I cannot lamp them off other than manually on the fixture.
In the new library, if a macro has been created to control a function of a parameter, that parameter's detail will instead display "Macros", to indicate the fixture macros can be used to access this function.
30 minutes ago, JWylie91 said:- Lots of auto created macros however no Lamp on macro
There are two fixture macros for the Mac 250 Entour. If you are seeing more these will be from other fixtures currently patched in the console. Lamp On can be accessed by selecting the fixture, and tapping the middle encoder button of the "Shutter, Strobe, Control" parameter, to view the details. You can then tap "Lamp On", to send the command.
30 minutes ago, JWylie91 said:- No response when selecting Lamp off in the macro menu
After selecting the fixture, and applying the "Lamp Off" macro, the first parameter is taken to full, and then lowered again. This can be seen in the DMX Outputs window, and so the macro seems to be working correctly. Can you confirm the DMX lamp off function hasn't been disabled on the fixture (PERS/dLOF)? More information on page 14 below...
https://cdn01.usedlighting.com/products/files/f58c30c67693da.pdf
If you have any questions let us know.
Edward
-
Hi Joe,
12 minutes ago, JWylie91 said:Installing it by loading the .exe file directly on the desk has worked.
Great, glad to hear it.
9 minutes ago, JWylie91 said:I was not previously aware of this method, Thanks guys.
Ah interesting. I am guessing, that you have come to FLX from an older ZerOS console, and therefore this is the method you have always been used to? Loading the software application directly into the console like a show file, is the recommended installation method, and is the method detailed in the release notes. Performing the software update via the bootable drive method, is more of a recovery tool now.
If you have any questions, please let us know.
Edward
-
Hi Joe,
48 minutes ago, JWylie91 said:I've tried installing this beta version on to our FLX today and no matter how many times I run the usb creator (which builds successfully), when i put our zero88 usb that I always use the lighting desk throws up this error when I try to do the install.
Have you tried installing the software, by simply loading the ZerOS 7.9.7.28 application (.exe) into the console from Setup -> Load?
Edward
-
Hi Jason,
1 hour ago, Jason Brameld said:There's always more than one way to skin a cat!
Thanks again for the excellent contribution to the debate.
Yes there certainly is! No problem at all!
Edward
-
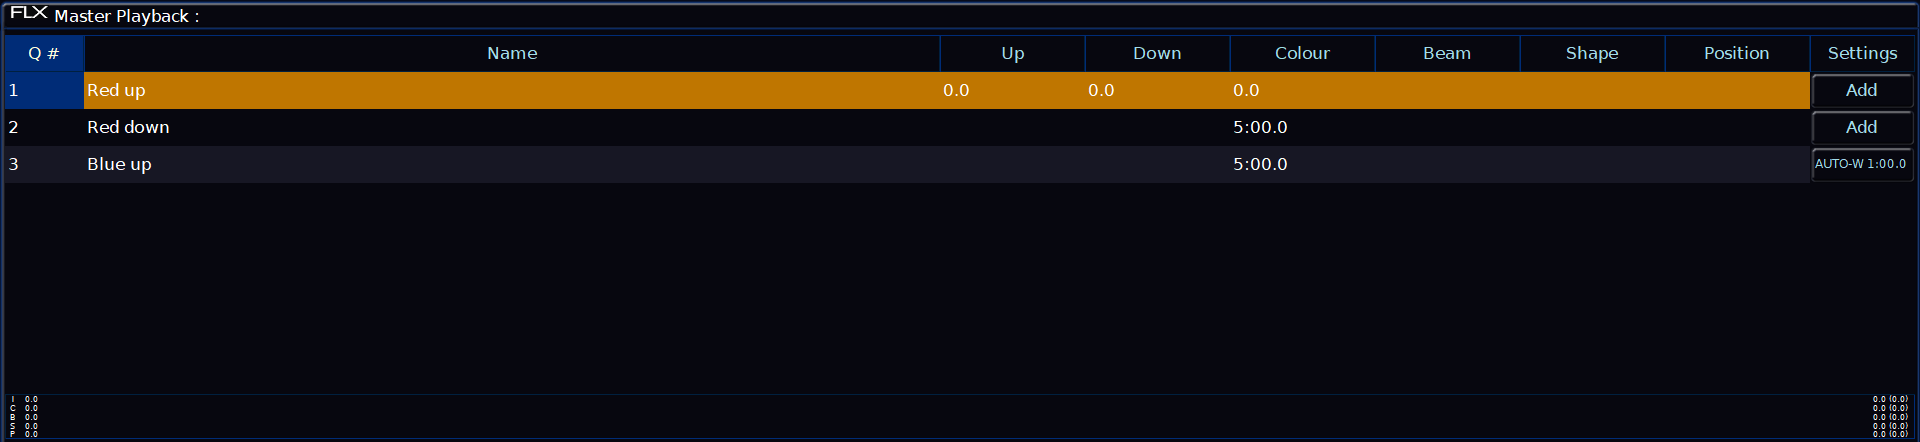
Hi Jason,
Here's another thought - we could just look at doing this with colour fades, and no intensity changes. This would mean we'd need to be careful with tagging as Kevin mentioned earlier.
The cue stack would look like this...
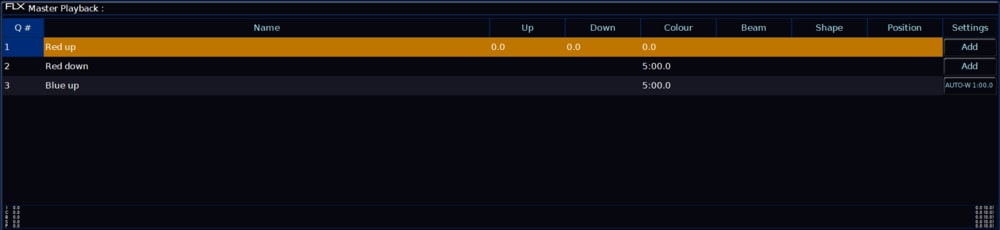
In cue 1, my fixtures are at full, in red.
In cue 2, my fixtures are at full, in black. You can create black quickly by using the slider in the colour picker window to pull all colour mixing down. When cue 2 is triggered, I therefore have a 5 minute fade out of red.
In cue 3, my fixtures fade up to full blue, a minute after cue 2 was triggered. The key however, is ensuring that only blue is tagged in cue 3. You can do this by creating blue, but then tapping on the "Red" and "Green" parameter displays so they have a dark blue background rather than light blue, which will display "Untag [Red]" and "Untag [Green]" in the command line. If red is tagged, it will not continue being controlled by cue 2, and so its fade out would slow, so that red would be out at the same time you reach full blue.
11 hours ago, Jason Brameld said:Lastly, in programming your cue sequence I couldn't use Smart Tag for all the cues as cue 2 has the fixtures 'off' and cue 3 has no brightness information in
If SmartTag is enabled, the console decides what gets stored. When SmartTag is disabled, you decide. Therefore for all of this, I have had SmartTag disabled, as I need to be specific about what does and what doesn't get included.
I hope this helps, let me know your thoughts.
Edward
-
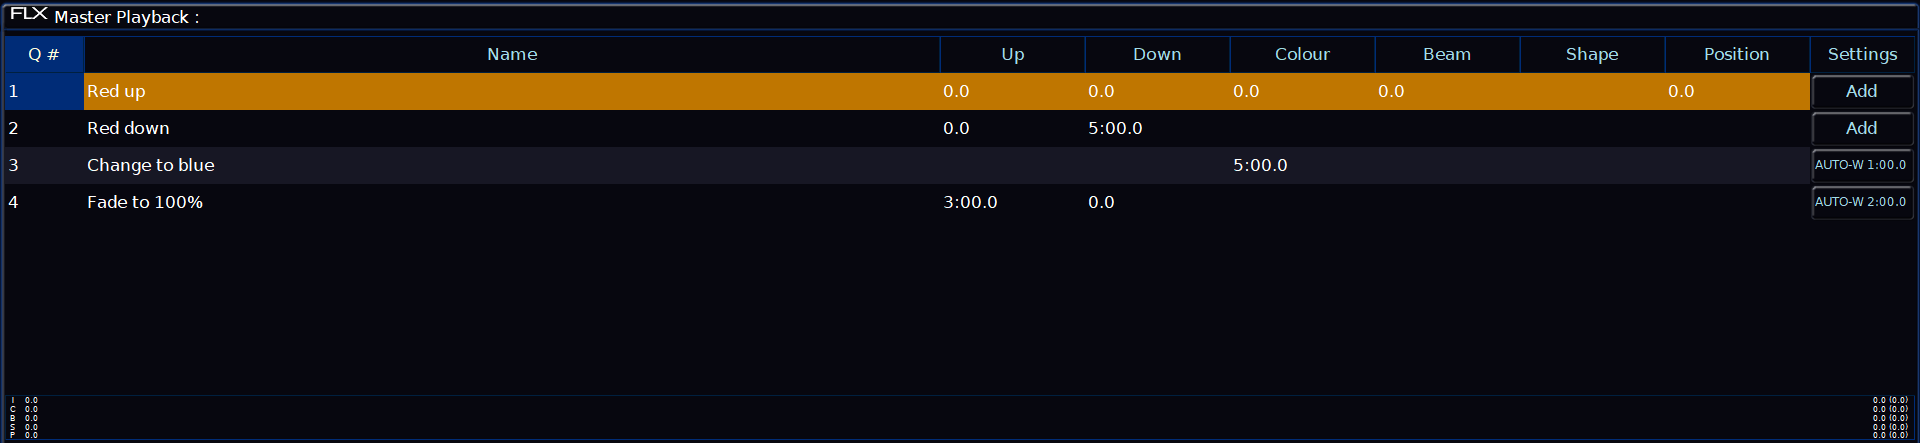
Hi Jason,
29 minutes ago, Jason Brameld said:Given that we seem to need 3 cues to do this by your way or mine,
Yes 3 cues is easiest here, as we turn lights off, change their colour, then turn them on again. You could probably get rid of “Cue 3” in my latest example, and also have the colour change from red to blue in cue 2, with colour having a 4 minute fade, and a 1 minute delay. My cue 4, would then need an Auto With wait time of 3 minutes. In many ways though, it is easier separating it out into separate cues for each part.
6 hours ago, Jason Brameld said:- <GO> Start with general FOH wash (tungsten)
- <GO> Add in red from side LED fixtures on a 5 minute fade up time
- <GO> Start a 1 minute colour fade of the red leds to 80% of full value (lose 1/5 of value in 1/5 of the fade time)
- <AUTO after end of Q3>Start a 4 minute colour crossfade to take reds out and bring blues to 80% of full value (bring in 4/5 of blues in 4/5 of the time - take out remaining 4/5 of reds)
- <AUTO after end of Q4) Start a 1 minute colour fade of blues from 80% to 100% of full value
Leaving fixture intensity at fixed level through Q3-5.
This works, however the fixtures will be halted at 80% for the duration of the colour fade, rather than dipping in intensity, however this may be what you’re after.
Edward
-
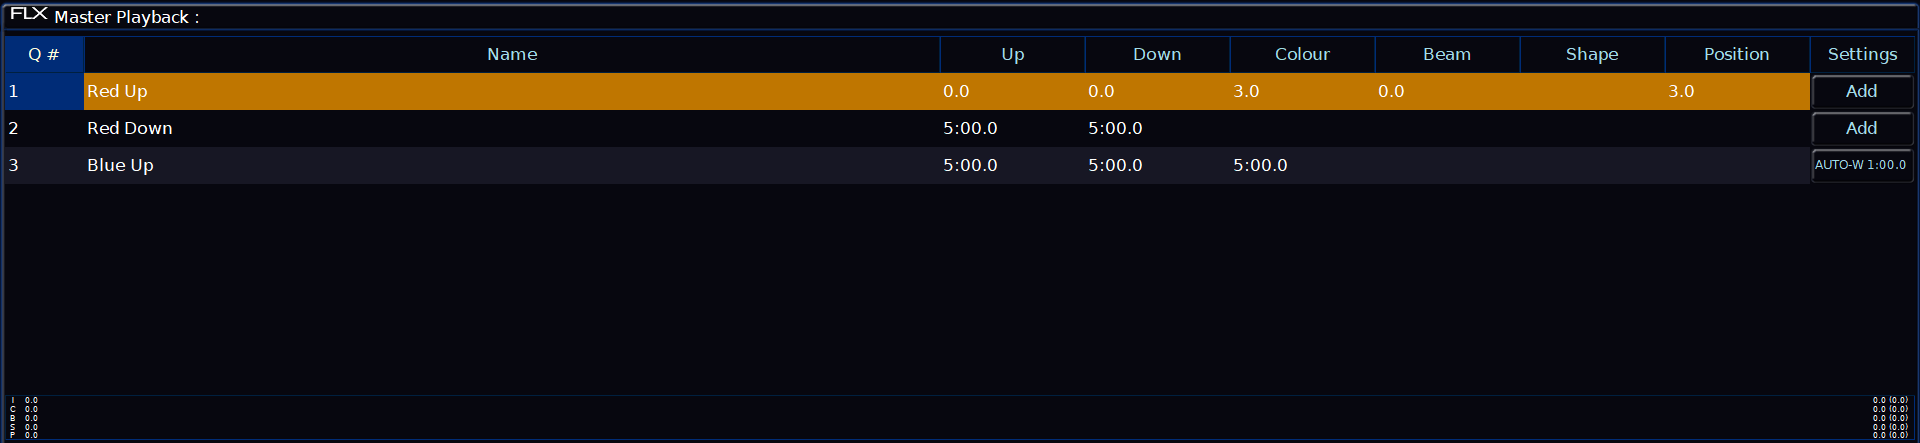
Hi Jason,
32 minutes ago, Jason Brameld said:Ah - but the red fade out should finish at minute 5, and not minute 6.....leaving the blues to continue from 80% to 100% in the last minute.
Good brain teaser huh?
The intensity of red, as shown in your graph, will have completed its fade to 0 at minute 5. This is true of cue 2 in my image above, due to the 5 minute fade down. Red fading down between minute 3 and 5 is theoretical in this instance, as the intensity will have begun to rise again at minute 3 (cue 4 starts).
However when red is at "0", there is still a minute of colour mixing left to complete, due to the 5 minute colour fade in my cue 2. If the colour needs to be full blue at minute 5, then simply change the colour fade in my cue 3 from 5 minutes, to 4 minutes. As cue 4 is set to "Auto With", not "Auto After", changing the timings of cue 3 will not affect cue 4.
This would then give in my example:
- In cue 1, your red lights are up.
- In cue 2, your red lights are fading down to 0% over 5 minutes. No colour information included, therefore no colour times are shown. [Minute 0 in your graph]
- In cue 3, your lights then begin the 4 minute cross fade from red to blue, which begins 1 minute after the reds started fading. There is no intensity information included, therefore no fade up/down times shown. [Minute 1 in your graph].
- In cue 4, your lights then begin to fade back up to full over 3 minutes, 2 minutes after they started to change to blue. This starts when they are magenta - 50% red and 50% blue, mid colour cross fade. There is no colour information included, therefore no colour fades are shown. [Minute 3 in your graph].
- Result once cue 4 has completed - a minute after completing the fade to blue, the fixtures hits 100%. [Minute 6 in your graph].
Hope this helps,
Edward
-
Hi Alex,
Thanks for the information.
For completeness, more information regarding MIDI on ZerOS can be found below...
http://support.zero88.com/990063141
Edward
-
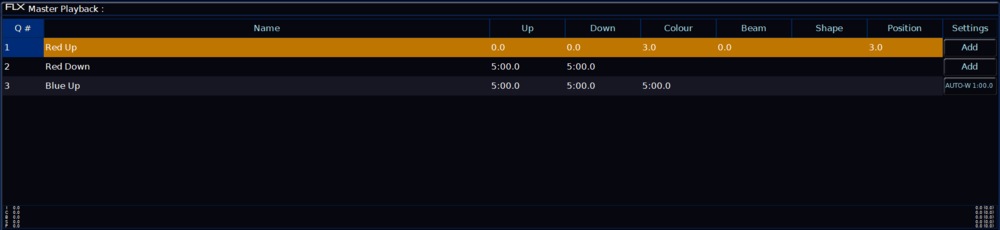
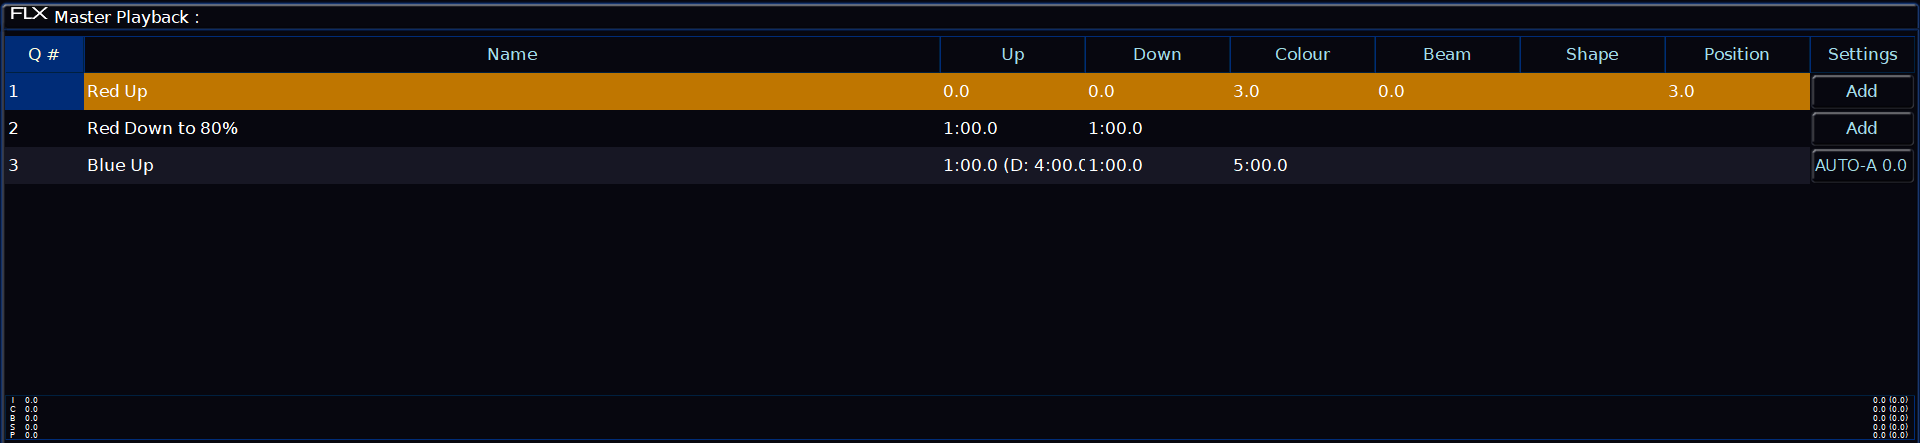
Hi Jason,
39 minutes ago, Jason Brameld said:This is what we want to achieve:
Thanks for the graph, that is great! Bet you wish your designer could have shown you that at the start!
In that case, we'll be looking at this...

In cue 1, your red lights are up.
In cue 2, your red lights are fading down to 0% over 5 minutes. No colour information included, therefore no colour times are shown. [Minute 0 in your graph]
In cue 3, your lights then begin the 5 minute cross fade from red to blue, which begins 1 minute after the reds started fading. There is no intensity information included, therefore no fade up/down times shown. [Minute 1 in your graph].
In cue 4, your lights then begin to fade back up to full over 3 minutes, 2 minutes after they started to change to blue. There is no colour information included, therefore no colour fades are shown. [Minute 3 in your graph].
Result once cue 4 has completed - red to blue fade ends at the same time as blue hitting 100%. [Minute 6 in your graph].
39 minutes ago, Jason Brameld said:Also if you have the intensity dip and the colour crossfade do you end up with the brightness dropping more in the middle doing it this way?
In theory the intensity of the colour will remain the same (assuming the red and blue LEDs are equally intense, which is unlikely), as you will go from one LED colour at full, to both LED colours at half (equaling the same intensity as one LED colour at full), to the other LED colour at full.
In your graph though of course, you are dipping to 40% of the overall intensity mid fade.
Hope this helps,
Edward
-
Hi Jason and Kevin,
2 hours ago, Jason Brameld said:This was the subject of much confusion as it was being asked for by the designer (who wasn't very good at explaining things) as well!!
Ultimately, it sounds like the designer was trying to explain what he wanted as if there were red PARs and blue PARs, not taking into account that for you, a red PAR and blue PAR are the same fixture when they're LED!
3 hours ago, Jason Brameld said:<AUTO 1 min after start of Q3>, start a 5 minute fade in of blues on the same fixtures as the reds (accepting that this will pass through various lovely shades of purple on the way (now I'm stuck.....red fade would then finish 1 min before the blues did).
Maybe I have misunderstood this, but it sounds to me this should look like this...
Your reds are up in cue 1.
Your reds start to fade down in cue 2.
After a minute, cue 3 fades your lights back up again, taking 5 minutes to get to their intensity, whilst they crossfade from red to blue, also over 5 minutes. Remember as far as the console is concerned, there are no lights fading down in cue 3. In terms of your output window, you will see them dip to 80% over a minute, and then raise to full over 5 minutes.
If after a minute of the reds fading down, you needed the fixtures to halt at 80% for 4 minutes, then raise to 100% over a minute, it could have looked like this...

Your reds are up in cue 1.
Reds fade down to 80% in cue 2 over a minute.
Cue 3 runs once the fixtures are at 80%, and the fixtures then start to change to blue over 5 minutes, however remain at 80% for 4 minutes, due to cue 3's delay time. They then raise back to full over a minute.
3 hours ago, kgallen said:If you wanted to keep the red and blue independent, then on your red fade out you would only tag the red colour and for the blue fade up only tag the blue colour. I believe this would require the desk to be set "keep parameters separate" for colour (that's probably the default). In both cues the intensity is retained at 100% so the fading of the colours is via the colour channel not the intensity channel.
Unless I have misunderstood, I therefore don't believe this is down to tagging. Worth mentioning, "Keep Parameters Separate" is set to "No" for colour, to ensure that with SmartTag disabled, if you move a colour encoder, all colour parameters will be tagged, to ensure all parameters are stored, equating to your desired colour.
I hope this helps and makes sense, if you have any questions let me know.
Edward
-
Hi Edden,
Welcome to the Zero 88 Forum.
I have replied to your Facebook message, however I’ll reply to your query here too.
It is possible to trigger Solution XL consoles, by adding an optional triggers card. This card has MIDI connections. SCS will be able to output MIDI with an appropriate USB to MIDI interface, which you can then use to trigger cues on the console.
The ENTTEC DMX USB Pro MK2 can be connected to one of the Solution’s USB ports, to give you another DMX output.
I hope this helps, if you have any questions let us know.
Edward
-
Hi Laurent,
Welcome to the Zero 88 Forum.
11 hours ago, Salander said:I've juste receive my new desk controller (FLX S24). of course I've a lots of questions.
That's great, glad to hear you chose FLX S.
11 hours ago, Salander said:- I need to add new fixtures, how I can do to create new when the led projectors are not in the list?
These are the steps to take if you cannot see your fixture in Add Fixtures...
https://zero88.com/library#support
If you would like us to make the fixture file for you, please email us a copy of the fixture's manual to fixturesupport@zero88.com, as mentioned in "Option 3" in the link.
11 hours ago, Salander said:Can I use my iPhone with the FLX S24 with the app "zeros remote" and "Zeros monitor"
Yes you can, for more information, see below...
http://support.zero88.com/996119181
11 hours ago, Salander said:phantom zero os can be use with a MAC?
Unfortunately, Phantom ZerOS is currently not available in a native Mac version.
If you have any questions, please let me know.
Edward
-
Hello,
36 minutes ago, pierotec said:Hi,
i can't connect with my apple watch anymore, probably after the Apple latest updates. I want to know if it is a problem that will be solved.
Thank you
Unfortunately the ZerOS Remote Apple Watch app is not compatible with watchOS 7. We will release an update to the app in future that supports watchOS 7.
If you have any questions let us know.
Edward
-
Hi Stan,
21 minutes ago, Stan Vigurs said:I have updated the software and that appears to have resolved the problem. I'll let you know if there are any further issues.
OK thanks for the update. Keep me posted if you have any queries.
Edward
-
Hi David,
25 minutes ago, Davidmk said:I've replaced my touch screen monitor with a reconditioned Windows tablet and a docking station and set up 3 connection configurations for different circumstance.
Sounds like a nice neat set up. Thanks for sharing.
Edward
Move on dark
in FLX
Posted
Hi Simon,
Hope you're well.
To change the Move On Dark timings for a playback, go into the Playback Settings by pressing and holding SETUP, and tapping the playback's button. Then choose the Move On Dark tab, and adjust the delay and fade time. Press OK on the Settings window, and you will see the new times displayed along the bottom of the playback status bar in the Cues window on the external monitor.
As @kgallen mentioned, Move On Dark timings are available for the whole playback, not individual cues. For individual cues, Don't Move flags are available in the Cue Settings.
Editing defaults within Setup -> Defaults, will never affect existing cues. These defaults will be used by any future cues recorded.
Hope this helps,
Edward