

Jon Hole
-
Posts
2,573 -
Joined
-
Days Won
51
Everything posted by Jon Hole
-

Fixture Request - Chauvet LED FollowSpot 75ST
Jon Hole replied to playbackenterprise's topic in General Discussion
Thanks - we'll add this to the next fixture library release. -
Yes - I usually have a bank of submasters purely for intensity, and then store position/colour/effects on all the other submasters without any intensity, so I can do exactly this.
-
Have done :-)
-
The below UK companies have FLX consoles available for hire. If you know of any other companies, please comment below and we'll add them to the list. (For FLX S consoles, please see this thread) Bright (Taunton) - brightbluelight.com Crystal Sound And Light (Liverpool) - crystalsoundandlight.co.uk Dynamic Production Solutions (Canterbury) - dynamicproductionsolutions.co.uk EES Showhire (Nottinghamshire) - showhire.com Entire Production Services (Aylesbury) - entireproductionservices.co.uk ESS (Bedford) - esshire.co.uk GES (Coventry) - ges.com Hawthorn (Leicestershire) - hawthorn.biz JFM Productions - jmfproductions.co.uk Laser Lighting (Ipswich) - laserlighting.co.uk Lightech (Cheshire) - lightech.co.uk Newport Event Lighting & Sound (Newport) - https://newporteventlightandsound.co.uk/ Platinum Event Solutions UK - platinumeventsolutionsuk.com SLX (Bristol) - slx.co.uk Showbitz (Exeter) - showbitz.co.uk STL (Kent) - stlproductionsgroup.co.uk TS Professional (Burgess Hill) - tsprofessional.co.uk Viking Lighting (Ipswich) - vikinglighting.co.uk Your Way Events Management (Blaenau Gwent) - yourwayeventsmanagement.co.uk
-
Hi Ollie, Have you tried using a chase? You could put the two ends of the isle, and maybe a few steps in the middle too. Jon
-
Hi Lufferov, Thanks for highlighting this. This is already scheduled for the next software release - along with opening the keyboard when pressing enter on the "name" column of cues, and in SETUP when naming fixtures. It has a reference of "ZOS-6114"
-
Hi Charles, There are several ways of doing this, here's one: In the "Output Window", select "Other Windows" top left, and then choose "System Info" from the menu options. In the window that opens, select "Event Monitor" along the top. Now, everything you press / move will appear in the event monitor.
-
Hopefully there should be no change if they don't want there to be - they could still record several playbacks each with a "cue 1" and manually fade between each playback like they currently do on submasters. This just gives them another method if they wish to use it. Definitely. If you do nothing, what you currently have will just transfer across without a problem. However, this gives you the option to have multiple scenes on a single fader - very similar to how we've setup your iLight system with the LEDs. Thanks Stefan!
-
Hi Vincent, Ah yes, I see. However, this does seem to work for Playbacks, so this will sort itself out in the next release because of this thread. Jon
-
Yes, you're correct - as long as you go in numerical order, tracking and move on dark (which are two different things, independant of each other for the most part) will work. Any "missing" cues will just be ignored
-
Hi All, As we've had such valuable feedback from our previous proposal, here's another! We're always looking for new ways to support our end users. 2015 saw our highest social media engagement via Facebook, Twitter AND YouTube. This forum was also the most active it has been for several years. We obviously also offer telephone and email support, run several training courses every month, and provide onsite support for events such as the Edinburgh Festival. So, what else? One idea is to run occasional live chat sessions, where users could bring questions and ideas into a "chat room" with Zero 88 staff. These would last for an hour or so at a time, and maybe run once a week (for example). It would also be an opportunity for us to ask you questions (just like this proposal and the previous one) so we can discuss them within a live "chat room" environment. Would this be of interest to you? If so, how often would you realistically want to take part in a session like this? And what times / days would work best for you? This is just one idea - if you have any others, please let us know! Many thanks Jon & the team
-
DVI-D is, kind of, a more modern digital version of VGA (that said, DVI's still not particularly modern but that was a deliberate choice during the development process!). Touch Screens require a second cable (USB) for the touch element. So you can have VGA Touch Screens or DVI Touch Screens. So, in short, no there's not VGA on the FLX - but DVI can be used for non-touch screens too.
-
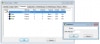
The only advantage is that you use one less DMX channel but have exactly the same control of the fixture. The problem is that it's the last channel of the fixture, which means the console will think it's only a 7 channel fixture, which can get confusing as the console will allow DMX addresses to be "overlapped" on this 8th channel. To get around this, double click the "DMX Allocate" (which in the image below is "3", but for you should be "7". That will open the small popup, where you can change it to "8". Again, I'd just ignore it if you don't need it. Alternatively, just put it as a "beamshape" parameter called ID, and ignore the "special" drop down box.
-
What I've described above is exactly the same as physically pushing the other fader up over the fade up time, and then brining it back down over the fade down time. So as long as the main cues run when you do that, they will when you add the chase in as described above. (The reason I'm not definitely saying yes, is there are all sorts of options you could select that will make all sorts of strange things happen!)
-
Thought it might have been! Do you understand what happened, or would you like me to explain?
-
Hi Tim, Have you got an external monitor plugged in? Half way down, by the FLX logo, what Playback does it say you're viewing? If it's anything other than "Playback 0", that will be the reason!
-
Not sure why that is, sorry. If you email Stan Bulan (stanbulan@yandex.ru) he should be able to help you.
-
Hi Rob, You create the chase on a separate playback, and then use a "macro" to trigger and release it during your cues. On the cue you want to trigger the chase, go to the "Cue Settings" cell and press Enter. Now choose "Macros", choose "Add" next to trigger, and select the chase. Click OK on both windows. On the cue you want to release the chase (it might be the next cue, or several cues later), do exactly the same, but choose "Add" next to release instead, and select the same chase.
-
It depends on two things really - how many requests we get and/or if we're already working on Move on Dark, in which case this can get added in. I think they both make perfect sense, so I'd like to try and push them through. However, I don't think it's going to be in the next two software updates, as they are both pretty well defined already I'm afraid.
-
Have you tried different USB sockets? Try the two on the back of the console for example. Also, do you have a powered USB hub? If you do, please could you try plugging that into the console, and the two devices into the hub, and see if that works? Thanks
-
All our distributor information is available by clicking "distributors" along the top of the page. Here you go: http://zero88.com/distributors/easterneurope/russia-diamond.shtml Regarding the faders, this might be helpful to you too: http://zero88.com/support/index.php?/Knowledgebase/Article/View/512/210/replacement-faders--sliders
-
If you email us your showfile, we can have a look at it for you :-)
-
There are two apps, here you go: https://play.google.com/store/apps/details?id=com.eaton.ZerOSMonitor.Rigger https://play.google.com/store/apps/details?id=com.eaton.ZerOSRemote.Rigger
-
Hi Rob, Thanks for taking the time to post here, glad you're getting on with the basics "with ease"! I've added these two requests as new software issues and below I've included our reference for each of these: ZOS-6982 ZOS-6983 All the best, Jon
