

kgallen
-
Posts
2,028 -
Joined
-
Last visited
-
Days Won
103
Posts posted by kgallen
-
-
This forum is like a train. Nothing for months then everyone is prepping for a Christmas show 🤣.
At least Santa is back from his holidays to help us out. 😎
-
 2
2
-
-
Put the speed parameter onto a playback fader and do it by hand?
I think you can do that… or is that Global Tap Tempo… 🤔
-
First I would check cabling, distribution and DMX termination.
If possible try the other DMX output socket on the console (assuming you’re not already using it).
-
Hi.
You will probably need to be in tracking mode and be very careful you only record the fixture changes you want in each fade to avoid ‘cross-pollution’.
You should be able to do this by recording two cues and setting the second with trigger ‘auto-with’.
Say you have cue 5 already recorded. Play cue 5.
Set lights for cue 6 with say 10s fades. Record as cue 6.
Clear-clear and play back cue 5 again.
Set lights for cue 6.5 with say 5s fades. Record as cue 6.5. Set the trigger as ‘auto-with 6’.
When you record cue 7 you will need to account for the lighting state that results after both cue 6 and cue 6.5 have run.
I hope that works!
-
(Deleted, Jon beat me to it with a better answer!)
I suppose I was giving a manual link too though! 🤣
https://www.zero88.com/manuals/zeros/cues-playbacks/playing-back-cues/triggering-releasing-playbacks
-
1
-
-
On 11/21/2024 at 8:05 PM, G-man said:
Probably a bit thin on the macro detail but I can live with that for now.
Here you go, 13ch and 29ch profiles. Based on your IFT but adjusted some items to what I think is usual Z88 format! Will probably just annoy you! Details added if of any use (possibly marginal on FF but useful on ZerOS consoles).
Regards, Kevin
-
 1
1
-
-
Yes it does and yes it works. RGB now!
-
2
-
-
Ok good.
clear-clear
View GO
Faders in channel mode
Push up some channel faders - I assume you have some fixtures patched!
Output window should show values
RECORD GO
does that work?
-
 1
1
-
-
No worries @Roland1234. Let us know how you go on!
-
Oh, @G-man seems I didn’t make a 2810 profile for you. I’ve been doing a few here recently I’ve lost track! Are you still in need or is your one good?
I’m out tonight (sorting out someone else’s Frog2!) but I could have a bash tomorrow as you’ve provided the manual.
-
Ok, great news. Hope your show goes well!
-
Is there anything to actually record? ie did you actually change an intensity or colour etc
There is no record disable.
If you press and hold RECORD is SmartTag enabled?
-
Press the Z key.
Make sure in the cue stack window your blue selection box is in the Name column, not the time columns.
In Setup you can force Intensity onto the first encoder at all times.
https://www.zero88.com/manuals/zeros/z-key/z-encoders?filter=3
https://www.zero88.com/manuals/zeros/selection-and-intensity/intensity-wheel
That any use?
-
Here you go @Roland1234. I made this with the Windows Fixture Editor 2.6, but probably this should be a multi-cell fixture. I don't have any software to make those, so if my file below works well enough then you'll have to contact the Zero88 boys to make you a proper full-featured one.
I've put detail behind some of the parameters, but not the long complex ones. Let's see if this as it is gets your light working better.
I've made Modes 1,2,3 properly but whilst Mode 4 is in there, I've not done the pixel detail channels, but I've set the DMX allocate so you can patch it as a fixture that consumes 109 DMX addresses.
Enjoy. I'm off to the moon now, so I'll not be contactable for a while 😉
BTW "thanks" @Davidmk 😬🤣
4 hours ago, Roland1234 said:We tried all the modes of the library and they responds only to the mode 1 - 16 bits.
Not quite sure what you mean here. All of the modes have the same DMX map for the lower 20 channels. Only the colour segment details change in the upper channels. Pan/Tilt are all 16-bit parameters and in Mode 2 the colour parameters are 16-bit.
-
43 minutes ago, Charlie Newman said:
Oh man, that's gonna be fun xD
Yea I ain't doin' Mode 4, I want to go to bed before 4am! 😄
Me and my big mouth... Right, here goes...
-
1
-
-
Thanks @Davidmk.
If I get time tonight I’ll have a bash at building a fixture profile for @Roland1234 to have a play with to see if it matches the function of his light better.
-
On 11/18/2024 at 5:47 PM, G-man said:
To Zero88's credit our 2003 Alcora (I still love this desk), the thin Frog and the Fat Frog are still doing amazingly well and are easy to use for all our crew. Also your support makes them last even longer. Keeping the faith!
With you there! Bought an Alcora in 2000 as my first own lighting desk. It comes out when I need a ‘little one’. Somehow I also seem to have an Elara… (and a Fat Frog… and an FLX…)! 😆 All still working ‘as new’ 😁 (and all bought brand new, except the Elara from eBay!).
-
1
-
-
@Roland1234 do you have a pdf of the manual you could upload here?
-
@G-man no problem!
Wow FrogOS 5.0.1, that’s an early one!
I think mine came with something like 9.4 on it, but then I was late to the party at 2006!
Glad the ole girl is still running dem shows just nicely! 😎
-
It sounds like the fixture definition from the library the console has doesn’t match the firmware function of the light. This is a constant problem especially with non-brand fixtures (I’m not familiar with Sparkx7).
Firstly: Is the mode set on the light the same as chosen on the console?
If you can get the manual for the light you could check it against what the console thinks controls each parameter.
If need be you could create a new fixture definition using the tool built into the fixture patch section of the desk using the info in the manual or manual+whatever deviations you found with the light.
-
Looks like we were talking about it here:
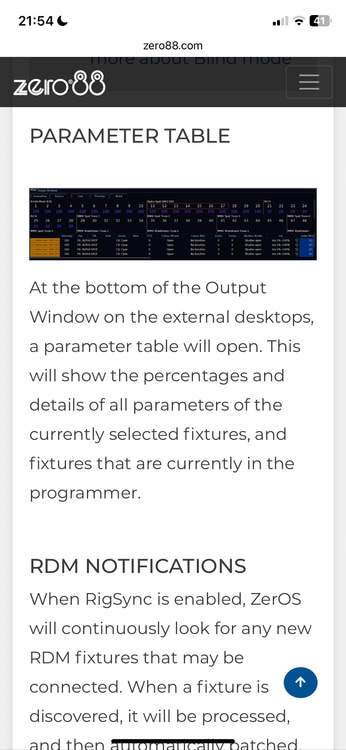
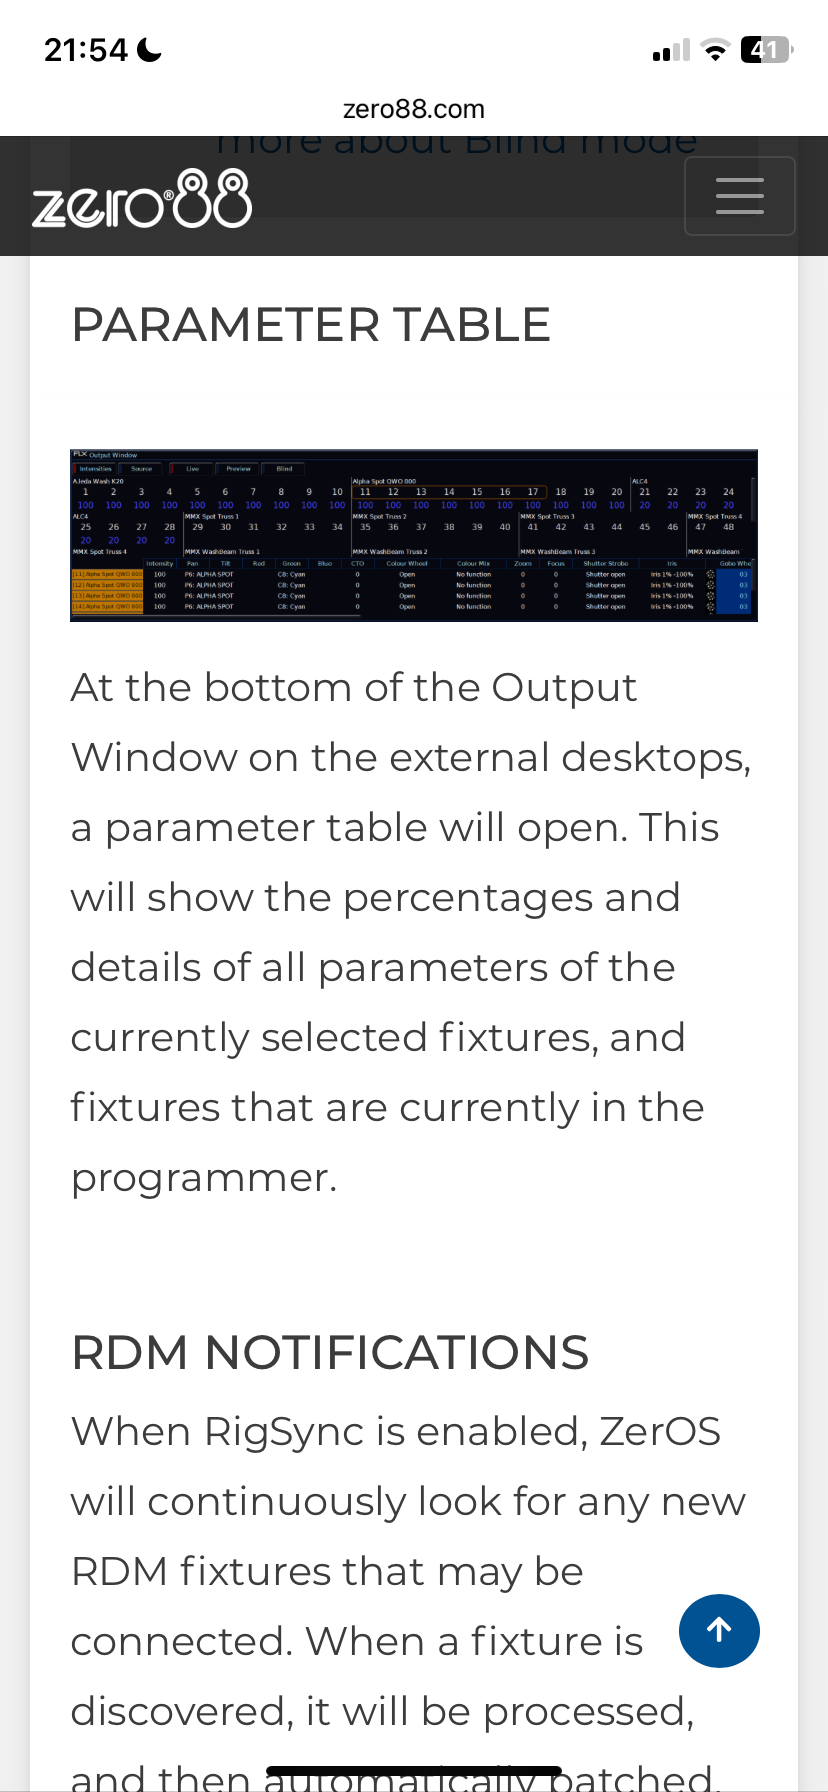
So the numbers on the encoder wheel are the raw value but the output window and any syntax uses percentage. Ok, that’s me all confused now! -
Well, wadaya know…
’percentages’
https://www.zero88.com/manuals/zeros/desktops-windows/output-window
-
26 minutes ago, Charlie Newman said:
Yup @kgalleninteresting that shows in %, personally I'd rather 1-255. Thanks for the help!
Yea weird. I wonder if there is a desk setting for that. I know it’s a topic that comes up every now and again. Like you I would have expected the raw value for all parameters except intensity. I’ll have a dig through the ZerOS release notes.
-
OK give this a bash. On channel 3, I've added detail (which I made up). 0-4 is "Closed", 5 is "Default", 6-255 is "Open".
Ch1 default (Dimmer [Intensity])=255, Ch2 (Wheel [Colour])default=0, Ch3 (Strobe [Beamshape])default=5
These are the "Details" for ch3:
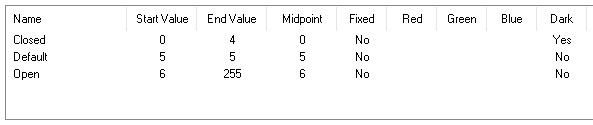
Let's see what comes up for the Strobe channel by default...
Put this on a USB stick and just use "Load" to get it in the desk. Then you'll have to patch, Manufacturer="Charlie", Fixture="Followspot 3ch"
-
1
-
Create chase the slows down!
in FLX S24 & FLX S48
Posted
Just select your 4 spots (order matters) and light them, Effect, pick chase1/4, use encoders to set speed and size to adjust depth of fade. Select Forwards/Backwards as required.
I’d record that into a new effect palette so you can grab it quickly. (Won’t store the intensity unless you green stripe that option in the record settings).