

kgallen
-
Posts
2,093 -
Joined
-
Last visited
-
Days Won
110
Posts posted by kgallen
-
-
Information for users (if anyone still cares!).
I recently purchased (2nd hand) two Chilli Jr dimmers for an install at a local voluntary art space.
As is my usual approach, I always inspect, refurbish and electrically test equipment before I deploy it.
On one of the Chilli Jr dimmers I purchased I observed an unusually high earth leakage current compared to the other Chilli Jr dimmer, when testing with my Megger PAT tester. Around 5mA compared to the <1mA observed on the other (#2) Chilli Jr dimmer.
I've tracked this down to the fitting of incorrect EMI capacitors at some locations on the phase trigger PCB. There is no evidence of any rework or repair on this board, so this looks like a factory pick/assembly error. These capacitors are used (correctly) elsewhere on the same PCB.
The phase trigger board takes the three mains phases (or three copies of single phase mains) and derives the zero-crossing trigger signals for the triacs. For EMI purposes, there are X2 and Y2 capacitors employed across the line, neutral and earth supply terminals.
- X2 capacitors are used line-neutral and fail short to trigger over-current protective devices.
- Y2 capacitors are used line-earth and neutral-earth and fail open circuit to avoid creating a shock hazard on the metal casing (since these dimmers are Class 1 devices).I've found X2 class capacitors fitted where Y2 class capacitors should be fitted in one of the Chilli Jr dimmers.
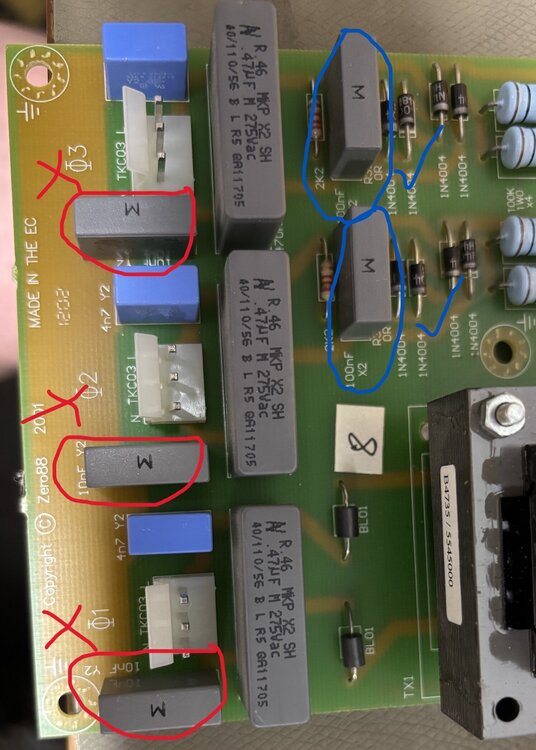
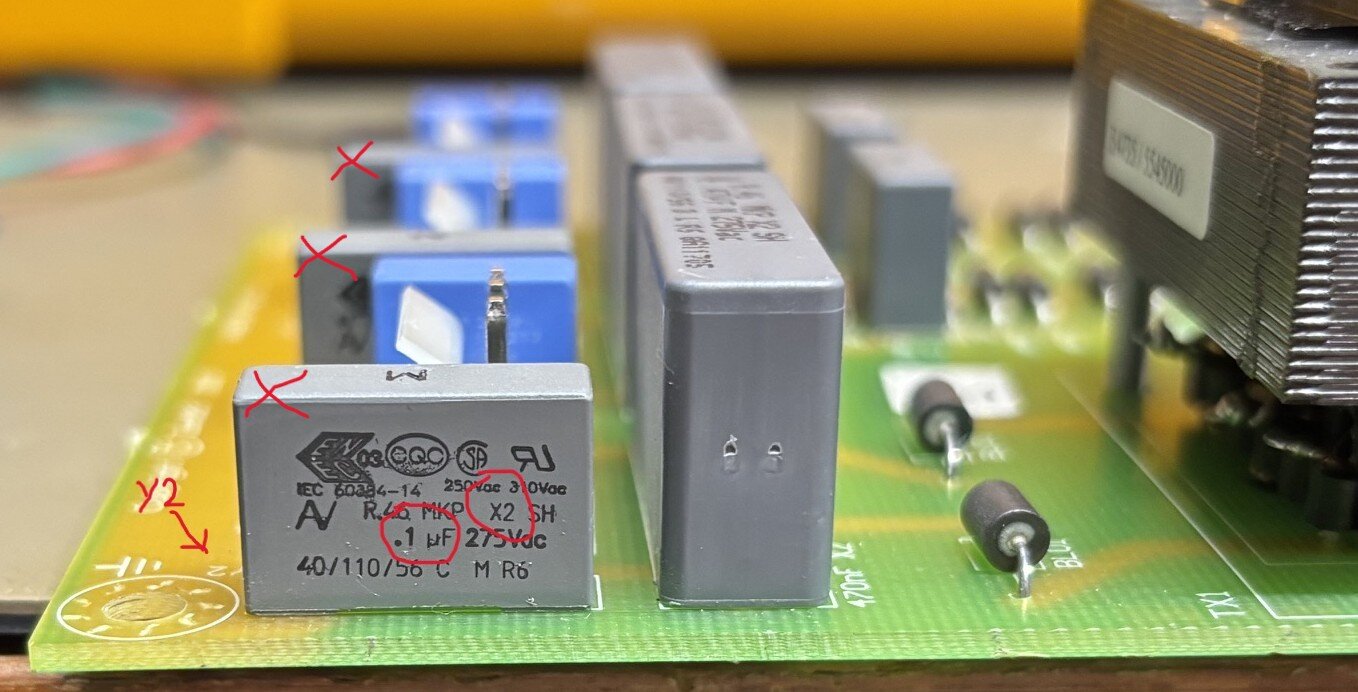
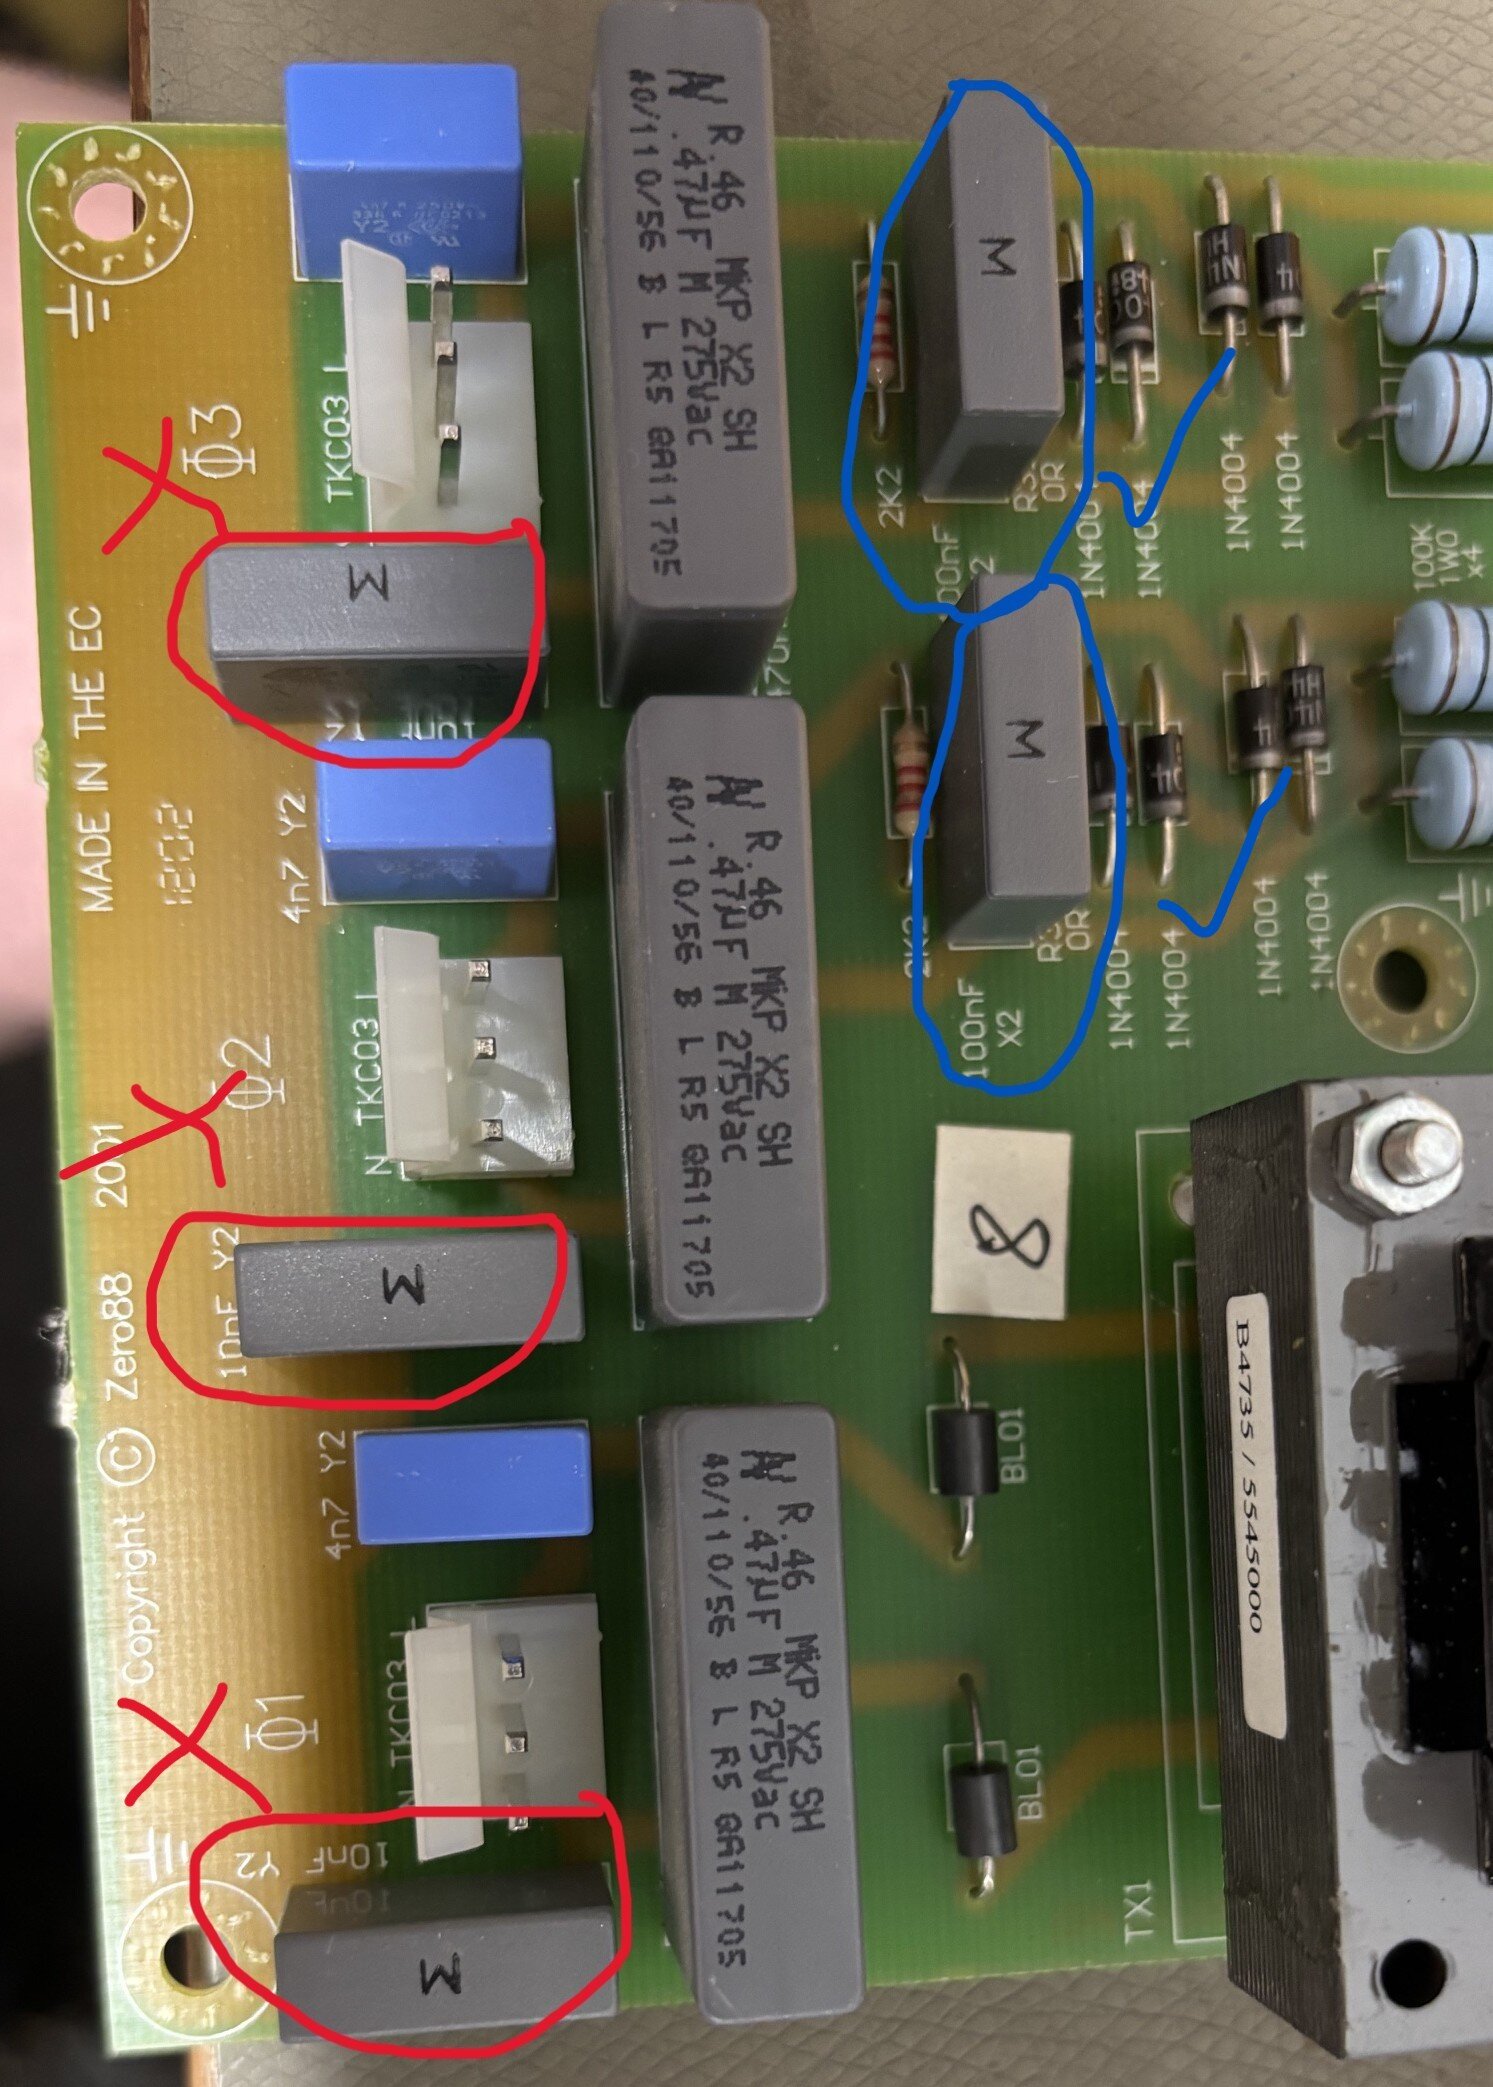
Photos show 0.1uF (100nF) X2 EMI capacitors fitted where 0.01uF (10nF) Y2 EMI capacitors should be fitted.
As can be seen in the following photos, the X2 capacitors are grey, the Y2 capacitors are blue.
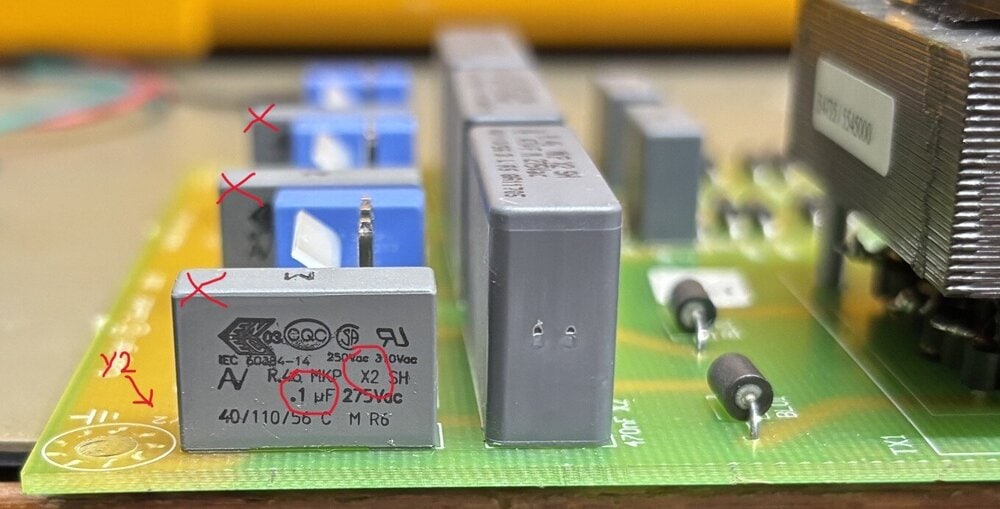
Incorrect X2 (grey) caps fitted N-E on all three phases. Correct Y2 (blue) caps fitted L-E on all three phases. Correct X2 (grey) caps fitted L-N on phases 2 and 3 (phase 1 has transformer isolation).
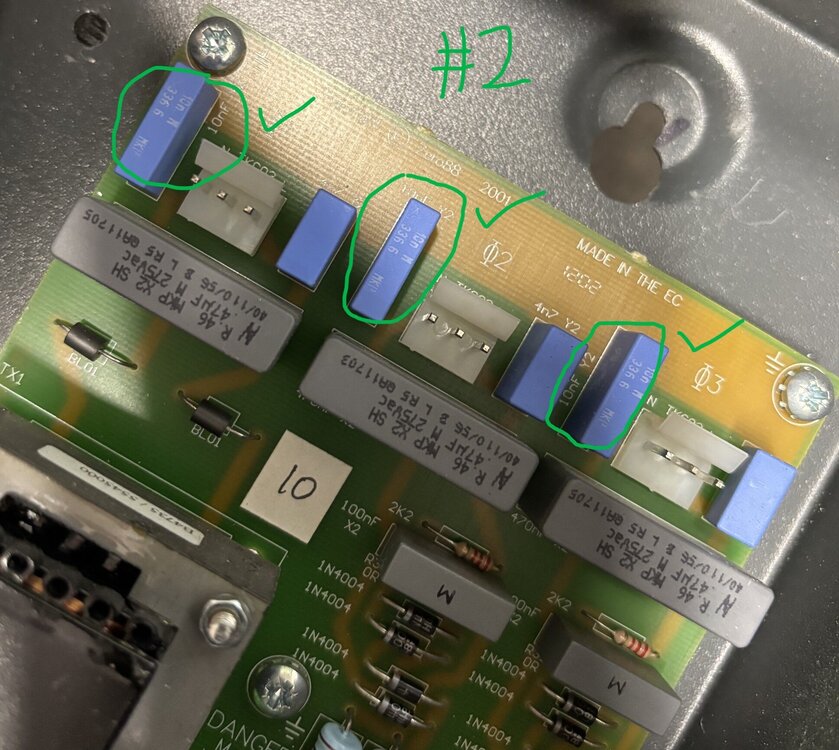
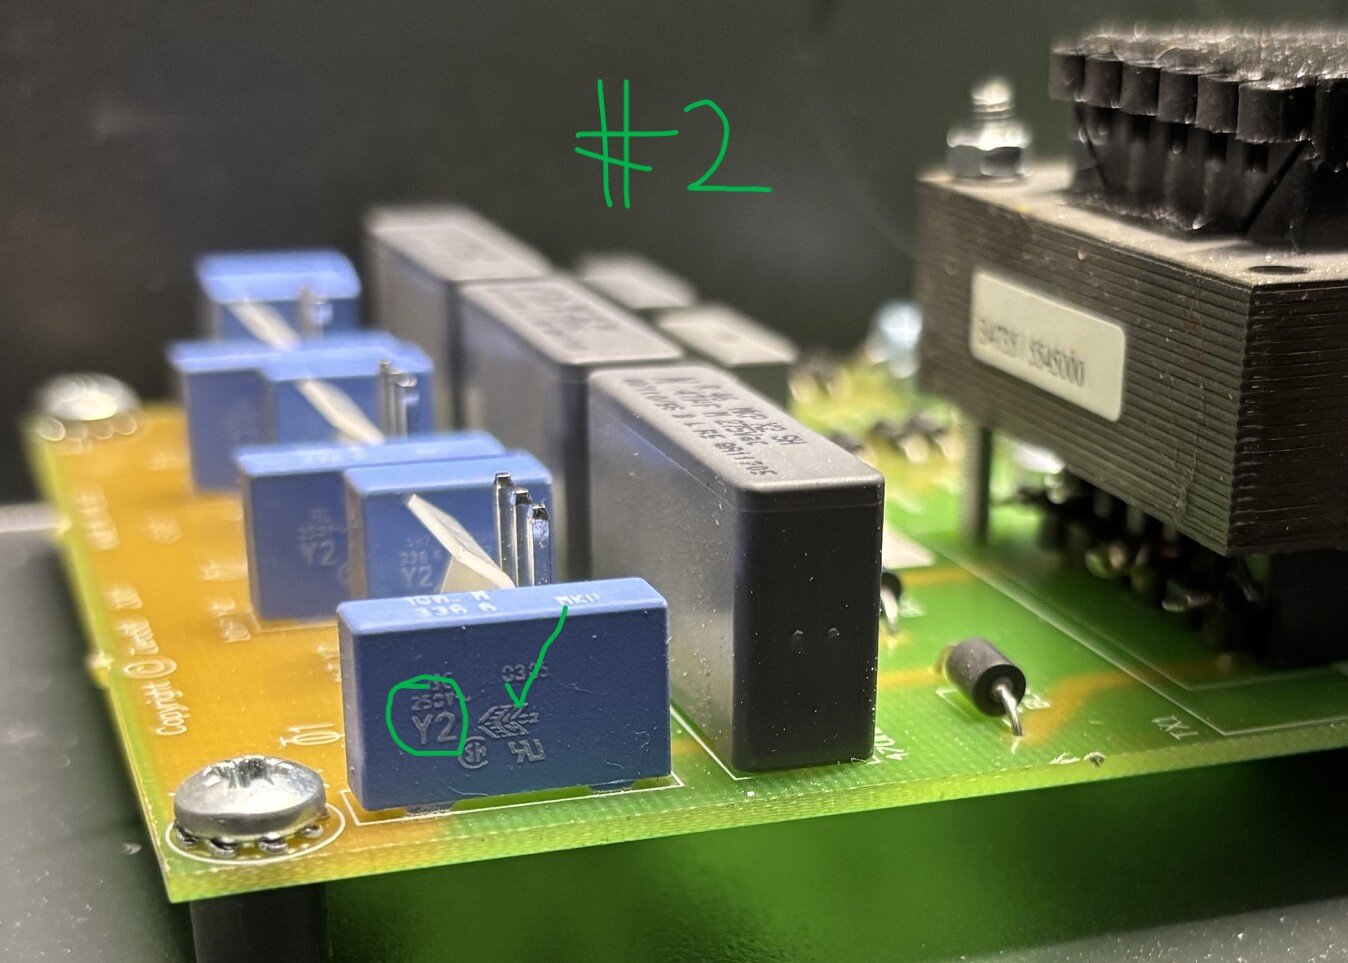
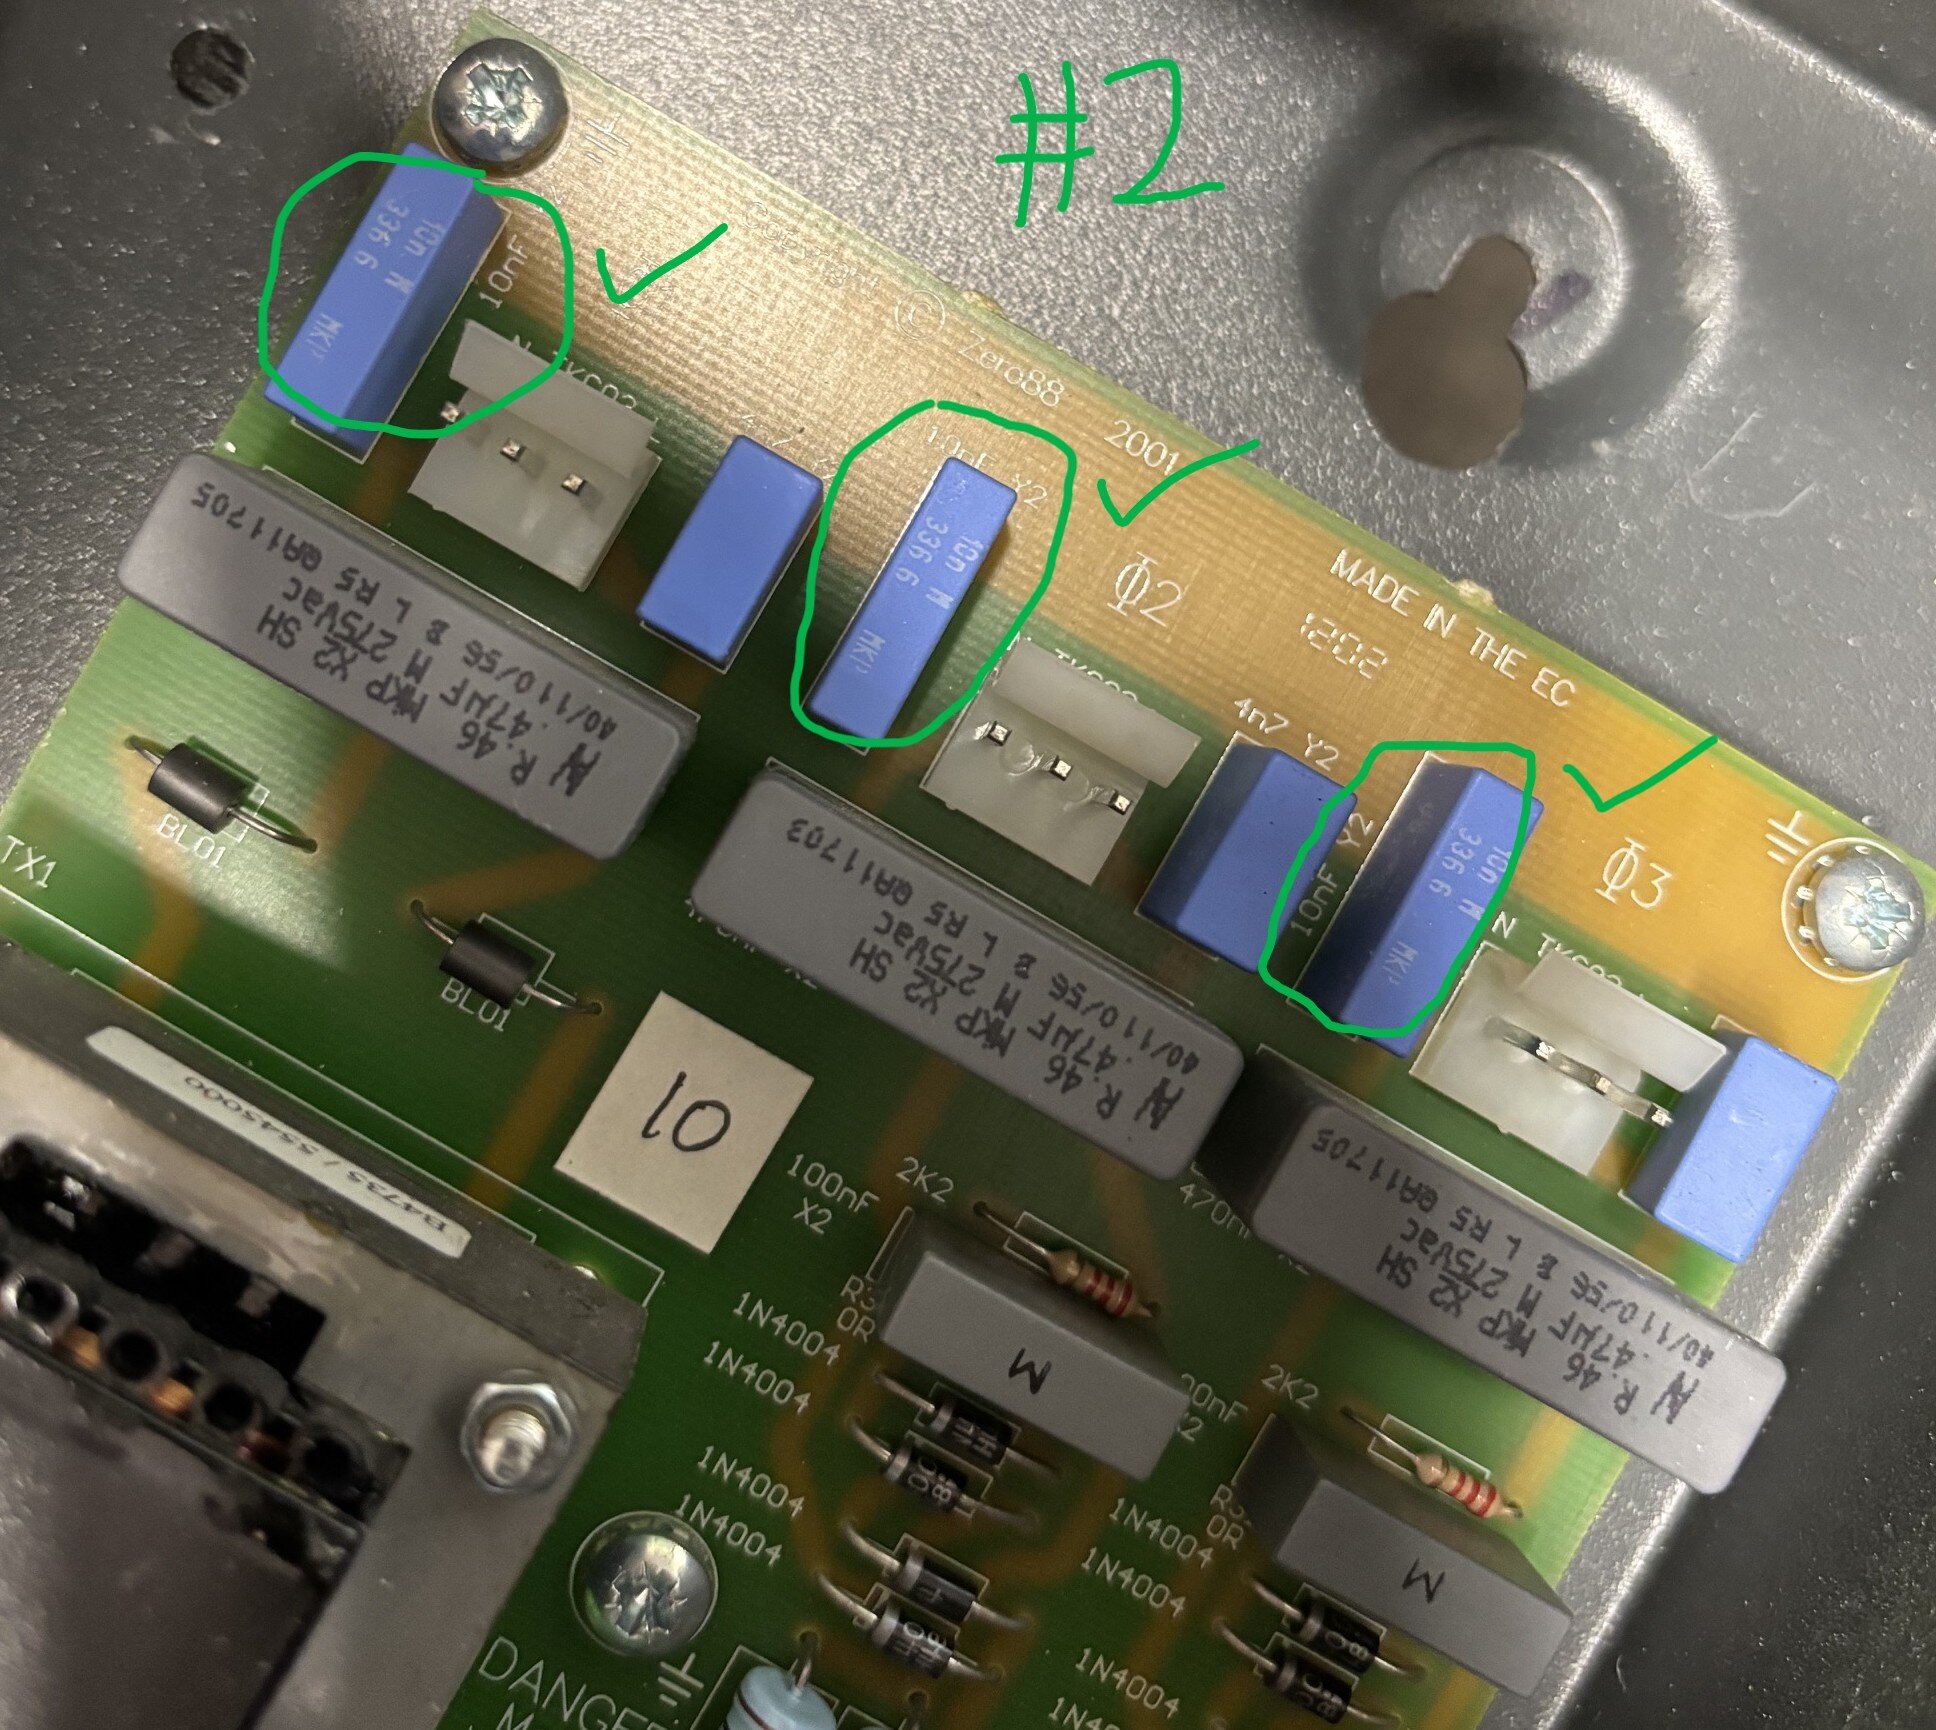
This is confirmed by observing in the Chilli Jr dimmer #2 the correct components fitted in these locations - blue Y2 caps.
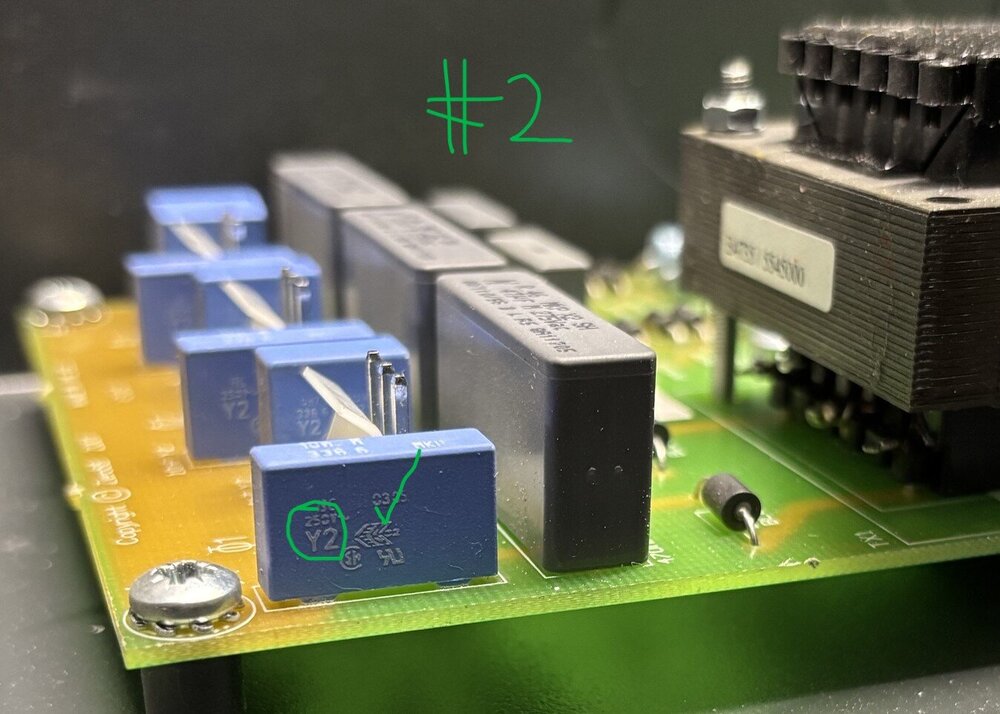
Correct Y2 (blue) caps are used correctly N-E and L-E. Correct X2 (grey) caps are fitted L-N on phases 2 and 3.
On Chilli Jr #1 I'm replacing the three incorrect X2 N-E caps with TDK Y2 caps of the correct value (10nF) and lead pitch (15mm).
Users beware.
-
 1
1
-
 1
1
-
-
Others will know better but over a network you’re probably looking at OSC
https://www.zero88.com/manuals/zeros/setup/triggers/osc-examples
Lots of post on this in the FLX and FLX S forums, have a look round.
-
I think you posted here, so looks like you have an "original" Leap Frog. Note you won't be able to contact Keith or Ian now (for very different reasons).
-
This is almost always a battery issue or accidental movement of DIP switches on the PCB when swapping the battery (others feel free to correct me!).
I would swap the coin cell for a guaranteed new one then boot the desk a couple of times since the software will need to rebuild some internal tables since the battery went flat. Trying to reinstall the OS will probably take you down a blind alley.
Also I recommend looking through through the Forum for other comments on this issue as this a common query.
Does your Leap Frog run FrogOS (10.12 latest) or ZerOS? There are two styles of Leap Frog with very similar names which is confusing.
-
That’s great news! Thanks for confirming and no shame in asking here!
-
Betapack 1 are solidly reliable so this is surprising to have a ‘total dead’.
There is no overall fuse in the unit as they can be wired single or 3 phase delta or star.
Are you sure your supply is ok? Check your supply MCB/RCD first if you haven’t. Does an Act 6 work in the same supply socket?
The Betapack power led should be lit (red or green depending on analogue desk supply polarity). None of the channel fuse neons should be lit.
Can you investigate more and provide more info?
-
If you really think this is correlated to start/end of show I would have a good think about what electrical disturbances could be happening in the venue. Tea urns, house lights, that sort of thing.
I got into the habit of always using a small computer UPS with my lighting (and sound) desk just to cover those brown-out situations that can occur on electrical systems and cause computer-based devices to crash or restart.
-
I’m sorry, Ian unexpectedly passed away a couple of years back. I think your only call is someone like White Light (who I believe had his spares stock).
-
-
Hi,
See this Manual page, scroll down to "Transmission". Does that help?
https://www.zero88.com/manuals/zeros/setup/universes/dmx-2
-
Ah... Secret Squirrel releases now then is it...
-
1
-
-
Chauvet P7
in FLX
I just looked in the manual, assuming it’s Geyser P7.
Theres nothing special. 1 channel for fog, then 14 for pretty lights. I didn’t see anything about the machine going to sleep.
Also seems there is nothing the DMX controller (FLX or Chauvet) could do wrong or cause what you observe.
Is the machine powering off completely?
Are you trying to fire smoke continually?
-
Chauvet P7
in FLX
Usually smoke machines have very simple controls. A channel for smoke, maybe a channel for a fan (more usual on a hazer). So the fixture profile is usually very unexciting compared to say a moving light. I would patch dimmer channels at the address your smoke machine is set for and have a play. Look at the DMX map that should be in the smoke machine document. Is there a channel that needs some weird value to keep the smoke machine awake? Within the Fixture patching steps you can create your own fixture for the smoke machine if you think the library one has some issue once you’ve played with the dimmer-per-channel thing above and checked the manual for any weirdness for the smoke machine.
-
I don't have a Jester or any service information sorry, but you might want to check out my post below to see if you have a similar issue.
Actually... looking through my emails, seems we've already conversed on this on the Blue Room. Sorry for the repeated info, I guess that's not the issue then? Also on a PM on BR I gave you some instructions for contacting the current support. Did you use those?
-
I don't have a Jester or any service information sorry, but you might want to check out my post below to see if you have a similar issue. I will also send you a PM.
-
Your fault is probably in “cue 2” where there are blocking values that stop the mover prepping for “cue 3” but in your real cue list where you’ve been copying what I said in previous posts is most likely the case. I’m assuming here you haven’t deliberately set ‘Don’t Move’ in any related cue Cue Settings - if you have that’s self explanatory!
-
-
See https://www.zero88.com/manuals/zeros/cues-playbacks/playback-settings/advanced?filter=2
for whole playback unblock.
-
Copying cues results in blocking cues when you paste. You will see white intensity numbers in the output screen.
1. Save your show.
2. GO into a cue you copied to, which shows the white intensity numbers.
3. Press and hold UPDATE to bring up the options window. Ensure SmartTag is enabled (red stripe). Press enter (or tap the playback go button)
Blocked values should change from white to purple (tracked) (unless you subsequently changed them after pasting in which case they will be blue or green) and now your move on dark into that cue should work.
4. Repeat for other copy-pasted cues.
Note: There is a method to unblock a whole playback in one go but I can’t remember where that option is. Check the manual.
4. Check the results on stage.
-
yea as @Davidmk says I don’t think you can keep the dummy lamp dark, you might as well just patch a scroller.
Is there any scope to duplicate DMX address patching? Can’t currently get my brain sufficiently off work to think this through but I’ll give it some thought.
-
OK this is 10 years old comment, but this is where Jon told me the association of dimmer has to be within the fixture. I think at the time I was trying to do something vaguely similar to you where I had a patched Source 4 and wanted to associate the scroller with it to support move on dark.
-
The scroller uses the intensity channel of the associated fixture to know when ‘dark’ (as I’m sure you’re well aware). Scroller probably only has colour attributes.
You might have to patch the lamp+scroller and patch the ‘lamp’ to an unused DMX address then use that bogus lamp fixture intensity to control your move on dark.
I think early days of my FLX I asked a similar type of question and it just came down to you need that linked intensity channel to support move on dark.
I know you probably don’t have time or access but this is a candidate for having a play to see what methods can be used to fool the desk whilst maintaining a usable workflow. I don’t think anyone left here knows how the desk actually uses the fixture information under lamp+scroller to know what cheats are viable.
-
8 hours ago, Davidmk said:
I think it would have to be a ‘built in’ effect. The key to this as identified at the start is the ‘release’ instruction the desk needs. I’m not sure even user macros on FLX can make this any easier. Some sort of ‘auto release’ would be needed.
-
Chilli Jr - excessive earth leakage current, potential safety issue
in Other Discontinued Products
Posted
Replaced the 3 incorrect caps. Tested ok. Earth leakage now <1mA as expected.